
Table of Contents
- What’s In The Box?
- What Are The Parts Of The Hd4000 Battery-Powered Backpack Sprayer?
- What is Included in the Accessory Bag?
- What are the Included Nozzles and Their Uses?
- How to Assemble the HD4000 Battery-Powered Backpack Sprayer
- How to Use the HD4000 Battery-Powered Backpack Sprayer
- How to Prime the HD4000 Battery-Powered Backpack Sprayer
- How to Troubleshoot the HD4000 Battery-Powered Backpack Sprayer
- How To Assemble and Fix Wand That Separates
- Preparing Your HD4000 For Winter Storage
- Battery Replacement, Disassembly-Reassembly, Pump Replacement
- Disassembly - Reassembly - Pump Replacement
What’s In The Box?
The following are included when purchasing an HD4000 Battery-Powered Backpack Sprayer:

Accessory bag

Wand in cardboard sheathing

Unit

Full-color manual

Extended warranty card
What Are The Parts Of The Hd4000 Battery-Powered Backpack Sprayer?
The HD4000 is a battery-powered backpack sprayer that is perfect for applying herbicides, insecticides, and other pesticides. It has a wide range of features that make it a great choice for pest control professionals and homeowners alike. The following are some of the key parts of the HD4000:

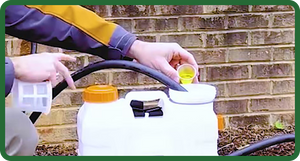
Lids
The HD4000 Battery-Powered Backpack Sprayer has two lids - a small and a big one. The big one is used to pour solutions, while the smaller one contains a measuring cup with graded lines on the side to help you measure your solution.

Removable Filter
The removable filter is used to strain your liquid as you pour it in. This will keep any unwanted objects from getting into the tank and clogging up the nozzle.

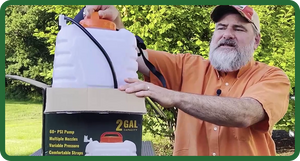
Backpack Straps
The backpack straps on the HD4000 are made from durable fabric and have a built-in cushioning system, which makes them comfortable to wear for extended periods of time. They also have a built-in waist belt, which helps distribute the weight evenly across your body.

Tank
The translucent tank on the HD4000 holds 4 gallons of liquid, which is enough to cover a large area. It also has measurement markings that show you at a glance how much liquid is left in the tank.

Control Panel
The control panel on the HD4000 gives you easy access to the red-rocker on/off switch, the spray adjustment dial, fuse compartment, and the charging port.

Switches
The red-rocker switch gives you an on or off option, giving full spray pressure when turned on. On the other hand, the silver knob allows you to dial the pressure up and down. You’ll be hearing a click when you turn the dial on or off. Make sure that you only use one of the switches and not turning them both on at the same time.

Battery
The battery on the HD4000 is a 12-volt, lead-acid battery, which provides plenty of power for extended use. It also has a built-in charge indicator, so you can easily track its level of charge.
What is Included in the Accessory Bag?
The following items are included in the accessory bag:

Valve Handle
The valve handle is adjustable and has a simple trigger lock for steady, pump-free spraying.

Nozzles
The PetraTools HD4000 Battery-Powered Backpack Sprayer comes with six different nozzles for various nozzles.

Plumber's Tape
The HD4000 backpack sprayer also comes with a roll of plumber tape. This is to ensure that there are no leaks in between the wand, valve handle, and hose.

Charger
The backpack sprayer comes with a charger with a lead-acid battery, so you can know when it is fully charged.

Set of Spare Gaskets, O-Rings, and Fuse
The backpack sprayer comes with a set of spare gaskets, O-Rings, and Fuse, in case you need to replace any that are worn out.
What are the Included Nozzles and Their Uses?
Every HD4000 comes with six versatile nozzles to help you tackle your toughest spraying jobs. You can purchase additional nozzles at our website. Here’s what each of your new HD4000 nozzles can do:

Orange Cone Nozzle
can reach 8-10 feet with a soaking shower. You can also adjust it for a finer mist.

Double Misting Nozzle
lets you cover a large area with a medium-fine mist. Perfect for watering young or delicate plants.

Single Misting Nozzle
has a very fine mist, perfect for flower beds or indoor greenhouse plants.

Yellow Flat Tip Nozzle
this delivers a nice, even, and wide fan of liquid which is perfect for green grass paint or mulch paint. If precise application of a solution is required, this nozzle is your best choice.

Brass Nozzle
this nozzle is like a garden hose, which you can adjust for a strong jet of liquid (over 20 feet).

Black Single Nozzle
Works just like the brass nozzle but is better for caustic solutions. Perfect for a variety of applications, from fine mist up to a straight stream, with a twist of the nozzle.
How to Assemble the HD4000 Battery-Powered Backpack Sprayer
If you are unsure where to get started, follow these simple steps when using your HD4000 Battery-Powered Backpack Sprayer for the first time.

Connect Your Preferred Nozzle to the Wand
Attach the desired nozzle to the wand by twisting it securely. Nozzles are available with a variety of spray patterns for different applications. You can also buy a multi-nozzle kit that will allow you to quickly switch between nozzles.

Connect the Wand to the Handle
Locate the wand connection on the bottom of the handle. Align the wand and handle and push them together until they lock in place. This will allow you to easily control the direction of the spray.
Connect the Handle to the Hose
Connect the hose to the top of the handle by pushing it on until it clicks into place. You can now use the on/off switch on the handle to turn the sprayer on and off.

Connect The Hose
The HD4000 has a 4-foot hose to help you reach those hard-to-get-to places. Simply connect the hose to the sprayer and tighten the connector by using Teflon tape.

Attach the Nozzles
The HD4000 also comes with six different nozzles for different uses. To attach the nozzles, unscrew the black nut on the top of the nozzle and attach the desired nozzle.
How to Use the HD4000 Battery-Powered Backpack Sprayer
Check out the guide below to learn everything you need to know when dealing with 'Product Title' Watch the video instructions to take with you.

Charge Your Sprayer Before Use
Make sure your HD4000 battery-powered backpack sprayer is fully charged before use. To charge, plug the battery charger into an outlet and connect the charger to the sprayer. The red light on the charger will turn green when the sprayer is fully charged.

Prime The Sprayer Pump
Before using your sprayer, you must first prime the pump. To do this, pour 2 gallons of warm water into the tank when using your sprayer for the first time. Turn on the sprayer and thoroughly saturate the area with water. Failure to prime the pump in this manner might result in poor pump performance at first.

Adjust The Sprayer Pressure Switch
The HD4000 has two pressure settings: high and low. The high setting is used for general spraying, while the low setting is used for more delicate tasks such as spraying flowers or seedlings. To adjust the pressure switch, turn the black knob on the side of the sprayer to the desired setting.

Read The Led Voltmeter
The HD4000 has an LED voltmeter that displays the battery’s voltage level. The LED voltmeter will be in the green zone when completely charged. The red light showing low charge indicates that the battery needs to be charged. Fully charge the battery by connecting it to a 110V outlet for 6 to 8 hours. Fill the tank with water and spray the device for at least 30 minutes to enable the voltmeter if it is not working when you arrive.
Pour Your Solution Into The Tank Through The Filter
Remove the cap from the tank and fill it with your desired solution. Be sure to use a funnel to avoid spills. Replace the cap and tighten it securely.

Start Spraying!
Press the wand release button and pull the wand back. Then, hold down the trigger and start spraying. Release the trigger to stop spraying.

How to Prime the HD4000 Battery-Powered Backpack Sprayer
Priming your HD4000 Battery-Powered Sprayer is quite easy. Just follow these two steps:

Add 2 gallons of warm soapy water into the tank.
Make sure that you use warm water and that you are adding the right amount of soap. Ideally, you should add around 2-3 scoops of liquid soap.

Close the lid and turn on the unit
Make sure that you have tightly closed the lid. Depending on what's causing the issue, you could have flow coming out of your hose within a few seconds to a few minutes.
How to Troubleshoot the HD4000 Battery-Powered Backpack Sprayer
Although it rarely happens, there could be times when the HD4000 Battery-Powered Backpack Sprayer won’t turn on. In case this happens, here’s what you have to do:

Check the switches.
When not in use, make sure that the switches are turned off. Leaving the switch and adjustment dial turned on, especially when charging, will keep the battery draining. To turn off the adjustment dial, turn all the way to the left until you hear it click.

Check if the lights in front of the unit are turning on.
There are two light colors on the front of the unit - green and red. The red light shows that the unit is on and means that the battery is charged.

Check the fuse.
To check the fuse, remove it from the control panel and take a good look at it. The fuse has a filament inside of it. Make sure that there is no burning inside and that the filament is attached correctly.

Check if the battery is charged.
To do this, try plugging the charger into the unit. If the unit is charging, the charger light will turn red. When doing so, make sure that you are plugging the charger into a working outlet.

Bypass the battery.
To know if the battery is working or not, all you have to do is plug the charger into the unit. Then turn it on, then the battery will be bypassed already. If it still doesn’t work, then you probably need a new battery.

Check the battery terminal connections.
There could be times that the battery terminals aren’t connected to the wires. To check such things, open the compartment at the back of the unit and take off the velcro strap. Check that both wires are connected properly to the battery.

Access the internal wiring.
If all of the above doesn’t work, you might want to check the wiring inside the base of the unit. To do this, separate the unit and the tank, then inspect if the wires are connected properly.

Check the internal wiring.
Checking the internal wiring is very important to ensure that all connections are in good condition. Find out if there are hanging or exposed wires, then fix them right away.
How To Assemble and Fix Wand That Separates
Here’s how you can assemble and fix wand that separates:

Slide the little end of the black wand tip into the wand's inner tube. Using plumbers tape to secure the connection is recommended.

Replace the little black rubber O ring in the groove at the tip of the wand; two O rings may provide additional stability (find an extra O ring your accessories bag).

Place the orange adapter on the tip of the O ring and slide the black piece to meet it, tightening the screws as much as possible.

At the tip of the finished wand, place the nozzle of your choice onto the plastic reducer.
Preparing Your HD4000 For Winter Storage
A few simple steps will ensure that your unit will be ready for use when spring finally arrives.
Run 2 gallons of warm water mixed with 2 teaspoons of liquid dish soap through the unit to clean all internal parts, then run 1 more gallon of warm water only through. Spray until unit, wand & hose are fully empty.

You may plug your HD4000 unit in for constant battery maintenance, or if this is not possible, simply charge fully before storage..

Place unit right-side-up in the warmest storage possible. Do not store long-term in temps below 32°F.
Storage in its original closed box is ideal, but if that’s not an option, you can cover with a canvas or plastic tarp to protect it.
Battery Replacement, Disassembly-Reassembly, Pump Replacement

Power down your device and remove the back cover. - When changing the battery, it is recommended to power down the device to avoid any potential damage.

Locate the battery. - Locating the battery is very easy. Just pop open the compartment of the device and you'll see it in there.

Remove the black and red wire connecting the battery to the device. - You'll see that there are two wires connecting the battery to your device. One is black and one is red. Gently remove these.

Take out the old battery. - The old battery will now come out easily. Just pull it out of the compartment.

Insert the new battery into the compartment.- Now, take your new battery and insert it into the compartment, making sure that the black and red wires are in the correct positions.

Reconnect the black and red wires to the new battery.- Take the black and red wires and reconnect them to the new battery. Make sure that they're snug and secure.

Close up the back of your device. - Now, just put the back cover on your device and you're all set!
Disassembly - Pump Replacement - Reassembly

Unscrew
At the bottom of the sprayer, you will see two phillip-head screws. Unscrew them using a screwdriver.

Separate the tank
Take those two screws out so you can separate the bottom part of the sprayer from the tank itself.

Remove the screws
Remove the three screws which attach the pump to the unit. Be careful not to damage anything.

Take off the hose clamps
Once the screws are removed, the hoses can be taken off by taking off the small hose clamps that are holding them in place.

Cut the wires
Disconnect the wires which are connected to the device. Cut the plastic tie first before doing so. Ideally, leave at least 4-5 inches on the wires. These can be disconnected by gently pulling on them.

Strip the wires
Strip about a half-inch of the plastic casing of the wires so that they can be reconnected more easily.

Reconnect the wires
Reconnect the wires to the device, being careful to not cross any of them. Make sure they're snug and secure.

Install the pump
Install the new pump by screwing it in and attaching the hoses. Be sure to put the hose clamps back on so that they're snug and secure.

Reassembly
To reassemble the HD4000, just make sure that everything is in place and then screw the tank and bottom part together. See to it that the two are closed tightly.

FREQUENTLY ASKED QUESTIONS
The HD4000 is a battery-powered backpack sprayer that allows you to quickly and easily apply pesticides, herbicides, and fertilizers to your property. It features a durable design that makes it perfect for use in rugged terrain, and it comes with a variety of accessories that allow you to customize its functionality.
Some of the key benefits of using the HD4000 backpack sprayer include: Easy maneuverability - thanks to its lightweight design, the HD4000 is easy to maneuver around your property; Flexible application options - the HD4000 comes with a variety of accessories that allow you to customize its functionality, including a spray gun, wand, and hose; Durable construction - the HD4000 is built to last, making it perfect for rugged terrain.
The HD4000 backpack sprayer can be used to apply pesticides, herbicides, and fertilizers. It is also capable of spraying water and other liquids.
No, the HD4000 backpack sprayer is easy to operate. Simply attach the desired accessory to the spray gun and pump the handle to start spraying.
The HD4000 backpack sprayer uses a 12-volt battery.
The battery on the HD4000 backpack sprayer lasts for approximately six hours of spraying time.
The HD4000 backpack sprayer comes with an initial 90-day warranty and 90-day extended warranty when registered. This ensures that if there are any problems with the HD4000, you will be covered. Additionally, the customer service hotline is available to help with any questions or concerns you may have.