
Table of Contents
- What’s In The Box?
- What Are the Parts of The HD3000 Battery-Powered Backpack Sprayer?
- What is Included in the Accessory Bag?
- What are the Included Nozzles and Their Uses?
- How To Assemble the HD3000 Battery-Powered Backpack Sprayer
- How to Prime the HD3000 Battery-Powered Backpack Sprayer
- How to Troubleshoot the HD3000 Battery-Powered Backpack Sprayer
- How To Assemble and Fix Wand That Separates
- Preparing Your HD3000 For Winter Storage
- How to Remove & Replace the Battery
- Disassembly, Pump Replacement, & Reassembly of the HD3000
What’s In The Box?
The following are included when purchasing an HD3000 Battery-Powered Backpack Sprayer:

Accessory bag

Wand in cardboard sheathing

Unit

Full-color manual

Extended warranty card
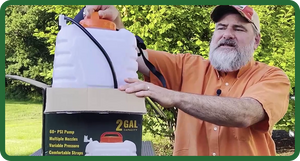
What Are the Parts of The HD3000 Battery-Powered Backpack Sprayer?

Wide-Mouth lid
The HD3000, like all of our battery-powered backpack models, features a wide-mouth lid for easy filling, emptying, and cleaning. You can safely & easily pour solutions in without worrying about spills.

Removable mesh strainer
All our backpack models feature a removable plastic mesh strainer inside the wide-mouth opening. This is great for trapping bugs, leaves, and other debris BEFORE it makes its way into the tank.

Backpack straps
The HD3000 features comfortable, thick-padded backpack straps for hours of spraying! Combined with its padded back pad, your toughest spray job won’t take a toll on your back & shoulders.

Tank
With its 3-gallon capacity, the HD3000 features translucent plastic construction for easy cleaning and lightweight portability.

Control Panel
Adjust the pressure to match your job with the pressure adjustment knob. Big enough to use with gloved hands, it lets you dial in just the right spray. The battery charger port is right beside the knob.

Battery
The lightweight ultra-life battery powers the HD3000 for up to 4 hours of spray time. Easily rechargeable and replaceable, the maintenance-free battery will last for years of use & includes a charger for plugging into a standard 110v outlet.
What is Included in the Accessory Bag?
The following items are included in the accessory bag:

Valve Handle
Our large grip valve handle has a simple red locking mechanism to prevent hand cramps.

Nozzles
We include 5 unique nozzles, allowing you to perform everything from close up misting to 20-foot spraying.

Plumber's Tape
Use the included tape to prevent drips where the parts thread on, like the valve handle & nozzles.

Charger
Plug it in and forget it. Our 110v charger plugs in to any standard US outlet and delivers a full charge quickly.

Set of Gaskets & O-Rings
We include a full set of spares to ensure your HD3000 is drip-free for years to come.
What are the Included Nozzles and Their Uses?
Every HD3000 comes with six versatile nozzles to help you tackle your toughest spraying jobs. You can purchase additional nozzles at our website. Here’s what each of your new HD3000 nozzles can do:

Orange Cone Nozzle
can reach 8-10 feet with a soaking shower. You can also adjust it for a finer mist.

Double Misting Nozzle
lets you cover a large area with a medium-fine mist. Perfect for watering young or delicate plants.

Single Misting Nozzle
has a very fine mist, perfect for flower beds or indoor greenhouse plants.

Yellow Flat Tip Nozzle
this delivers a nice, even, and wide fan of liquid which is perfect for green grass paint or mulch paint. If precise application of a solution is required, this nozzle is your best choice.

Brass Nozzle
this nozzle is like a garden hose, which you can adjust for a strong jet of liquid (over 20 feet).

Black Single Nozzle
Works just like the brass nozzle but is better for caustic solutions. Perfect for a variety of applications, from fine mist up to a straight stream, with a twist of the nozzle.
How to Assemble the HD3000 Battery-Powered Backpack Sprayer
If you are unsure where to get started, follow these simple steps when using your HD3000 Battery-Powered Backpack Sprayer for the first time.

Like most of our sprayers, the ‘heavy lifting’ has been done for you at the factory or our warehouse. But there are a few quick steps that’ll have you up & running in just a few minutes.

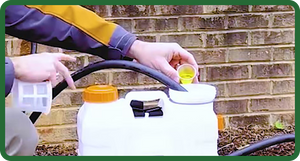
Thread the Valve Handle Onto the Hose
The hose coming from the tank has a female threaded adapter, and the valve handle has male threads on the end opposite the red trigger lock. Wrap this join with plumber’s tape and thread together. Do not overtighten.
Thread the Wand Onto the Valve Handle
The wand, found in its own cardboard sheath, threads onto the other end of the valve handle. After wrapping this join with plumber’s tape, screw the wand down but do not overtighten.

Select the Nozzle You’ll be Using
Select the nozzle you’d like to try first, wrap the join with plumber’s tape, and thread the nozzle down.
How To Use the HD3000 Battery-Powered Backpack Sprayer
Your new HD3000 is built for ease of use, but if you need a hand, check out these quick-start instructions.

Charge Before Use
We recommend fully charging your HD3000 before using it on your first job. Plug the included charger into the port on the control panel, and then plug it into a standard 110v outlet. Your unit should be ready for use in 2-3 hours.

Prime the Sprayer Pump
Your unit will run better if primed before the first use. Pour 2 gallons of warm tap water into the tank. Add 2 tsp liquid dish soap. Spray all water through the unit. Depending on how high the pressure dial is adjusted, this should only take a few minutes.

Add Liquid of Your Choice
The HD3000 works great for spraying all kinds of liquids, but do not spray anything thicker than skim milk or anything flammable. Add liquid through the mesh strainer in the lid to prevent foreign material entering the tank.

Dial In the Pressure
Using the pressure knob on the bottom/side of the tank, turn clockwise. The unit’s pump will build pressure and then stop/start as needed.
Squeeze the Valve Handle
Apply pressure with your hand to the trigger on the valve handle, or alternatively, press it down & engage the red locking mechanism for constant uninterrupted flow.

Ensure that the pressure adjustment knob is turned off when you’re finished. You should feel/hear a click when you turn the knob to the off position.

How to Prime the HD3000 Battery-Powered Backpack Sprayer
Priming your HD3000 Battery-Powered Sprayer is quite easy. Just follow these two steps:

Add 2 gallons of warm soapy water into the tank.
Make sure that you use warm water and that you are adding the right amount of soap. Ideally, you should add around 2-3 scoops of liquid soap.

Close the lid and turn on the unit
Make sure that you have tightly closed the lid. Depending on what's causing the issue, you could have flow coming out of your hose within a few seconds to a few minutes.
How to Troubleshoot the HD3000 Battery-Powered Backpack Sprayer
Although it rarely happens, there could be times when the HD3000 Battery-Powered Backpack Sprayer won’t turn on. In case this happens, here’s what you have to do:

Check the switches.
When not in use, make sure that the switches are turned off. Leaving the switch and adjustment dial turned on, especially when charging, will keep the battery draining. To turn off the adjustment dial, turn all the way to the left until you hear it click.

Check if the lights in front of the unit are turning on.
There are two light colors on the front of the unit - green and red. The red light shows that the unit is on and means that the battery is charged.

Check the fuse.
To check the fuse, remove it from the control panel and take a good look at it. The fuse has a filament inside of it. Make sure that there is no burning inside and that the filament is attached correctly.

Check if the battery is charged.
To do this, try plugging the charger into the unit. If the unit is charging, the charger light will turn red. When doing so, make sure that you are plugging the charger into a working outlet.

Bypass the battery.
To know if the battery is working or not, all you have to do is plug the charger into the unit. Then turn it on, then the battery will be bypassed already. If it still doesn’t work, then you probably need a new battery.

Check the battery terminal connections.
There could be times that the battery terminals aren’t connected to the wires. To check such things, open the compartment at the back of the unit and take off the velcro strap. Check that both wires are connected properly to the battery.

Access the internal wiring.
If all of the above doesn’t work, you might want to check the wiring inside the base of the unit. To do this, separate the unit and the tank, then inspect if the wires are connected properly.

Check the internal wiring.
Checking the internal wiring is very important to ensure that all connections are in good condition. Find out if there are hanging or exposed wires, then fix them right away.
How To Assemble and Fix Wand That Separates
Here’s how you can assemble and fix wand that separates:

Slide the little end of the black wand tip into the wand's inner tube. Using plumbers tape to secure the connection is recommended.

Replace the little black rubber O ring in the groove at the tip of the wand; two O rings may provide additional stability (find an extra O ring your accessories bag).

Place the orange adapter on the tip of the O ring and slide the black piece to meet it, tightening the screws as much as possible.

At the tip of the finished wand, place the nozzle of your choice onto the plastic reducer.
Preparing Your HD3000 For Winter Storage
A few simple steps will ensure that your unit will be ready for use when spring finally arrives.
Run 2 gallons of warm water mixed with 2 teaspoons of liquid dish soap through the unit to clean all internal parts, then run 1 more gallon of warm water only through. Spray until unit, wand & hose are fully empty.

You may plug your HD3000 unit in for constant battery maintenance, or if this is not possible, simply charge fully before storage..

Place unit right-side-up in the warmest storage possible. Do not store long-term in temps below 32°F.
Storage in its original closed box is ideal, but if that’s not an option, you can cover with a canvas or plastic tarp to protect it.
How to Remove & Replace the Battery on Your HD3000
The lead acid battery found in your HD3000 uses reliable, time-tested technology that will last for many years of safe use. If you notice your battery begin to lose charge, or only enough for short spray jobs, it’s time to replace it. You can purchase brand new batteries from the PetraTools website. Here are the steps required to remove & replace the old battery.

Make sure the pressure gauge is turned counterclockwise to the OFF position, and that the battery charger is not plugged into the unit.

On the back of the unit, at the bottom, there’s a small battery compartment door under the back pad. Press the button to open this door.

There will be a red wire & a black wire attached to the battery. You can either remove the wires at the terminal, or cut the wire close to the terminal with wire cutters. Make note of which wire was attached to the + and – terminals.

Slide the old battery out. Please recycle!

Place the new battery with the terminals oriented the same way as the old battery. Reattach the red & black wires as they were on the old battery.

Slide the new battery back in to the battery compartment & close the black plastic door until the button clicks.
Disassembly, Pump Replacement, & Reassembly of the HD3000
The pump in your HD3000 is easily replaceable by following these simple steps. As with all replacement parts, our warehouse in Carlisle PA has plenty in stock. Give them a call at 1-800-613-6889 or go to our website, www.petratools.com

Make sure the pressure gauge is turned counterclockwise to the OFF position, and that the battery charger is not plugged into the unit. Empty any liquid from the tank.

Turn the unit upside down. There are two Phillips screws recessed into holes in the bottom. Unscrew both of these & place in a safe place.

Remove the bottom orange or black plastic piece from the unit by lifting it up & away from the tank.

Remove the screws that hold the pump into the unit. Put them in a safe place once removed. You will need to re-use them.

Next you will need to remove the hoses by squeezing the hose clamps to release pressure. Pull the hoses off of the pump.

Remove the two wires that provide power to the pump, a + wire and a – wire. Remember where these wires were connected for reassembly.Lift the old pump out.

Reattach the two wires exactly as they were before. You may need to strip ½” of the plastic insulation from the ends of the wires to make this easier.

Reconnect the hoses by opening the hose clamps and sliding them back into place.

Replace the screws holding the pump in place from step #4.

Carefully work the bottom of the unit back into place under the tank. Ensure that the screw holes are lined up. Replace the screws from step #2.